Optimising BlueStacks for better performance
You've just installed BlueStacks 5 and want to know how to optimise your Android emulator? To get the best possible performance, follow the guide!
In this article, I'm going to show you everything you can do to optimise BlueStacks. I'll explain how to configure the emulator to boost performance and play with better graphics!
Contents
view
Needed PC configurations to optimise BlueStacks 5
Before we look at how to optimise BlueStacks 5, you need to make sure that your PC configuration is suitable. We'll explain the minimum system requirements and the optimum configuration for using the emulator.
Minimum system requirements for BlueStacks 5
- Windows 7 or higher
- Intel or AMD processor
- 4 GB RAM minimum
- 5 GB of free disk space
- You must be an Administrator on your PC.
- Up-to-date graphics drivers from Microsoft or chipset supplier.
Recommended configuration for BlueStacks 5
- Windows 10
- Intel or AMD multi-core processor with a performance score > 1000
- Intel/NVIDIA/ATI, embedded or discrete controller with a score >= 750
- 8 GB or more
- SSD (or hybrid/fusion hard drive)
- High-speed connection to access games, accounts and related content.
- Up-to-date graphics drivers from Microsoft or chipset vendor.
Now let's take a look at how to optimise BlueStacks for optimum performance.
1. Enable hardware-assisted virtualisation to optimise BlueStacks
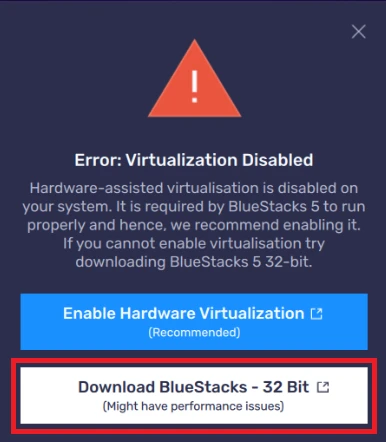
Enabling hardware-assisted virtualisation is the most important thing you can do to optimise BlueStacks and get better performance.
Virtualisation is already enabled on most PCs running Windows 10, as well as on all PCs running Windows 11. If this is not the case on your computer, you will get a warning message. On the other hand, if the option is enabled, you won't get any message and will be able to launch BlueStacks 5 without any problem.
Do you need to enable virtualisation to use your emulator? Before going any further, check that your processor allows this with these 2 tools:
- INTEL virtualisation detection tool ;
- AMD virtualisation detection tool.
If your processor supports virtualisation, you'll be able to boost your emulator's performance ! To do this, you need to restart your computer and access your BIOS at start-up:
- for Asus: F2 ;
- for Acer: F2 ;
- for HP: Esc.
This may vary depending on the model and brand of PC, but the most common keys are F2, escape or del.
Once you are in the BIOS, you need to enable virtualisation. Here is an example for an Intel BIOS:
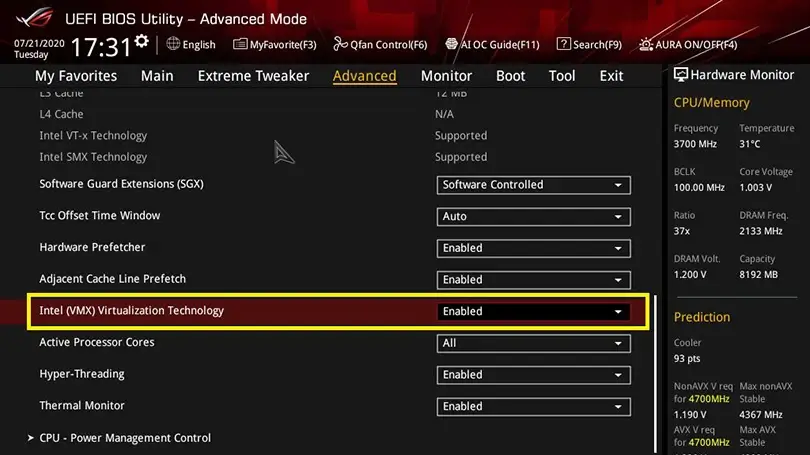
Note that you probably won't get this layout for your BIOS, but the principle remains the same. Once you have enabled virtualisation, simply save your changes and restart your PC to optimise BlueStacks.
2. Antivirus and virtualisation: they don't mix!
In some cases, your antivirus software can degrade the performance of your virtualisation. The antivirus that causes the most problems for the BlueStacks emulator is Avast Antivirus because of one of its settings.
To disable this setting and optimise BlueStacks :
- go to the avast Menu (top right) then to Avast Settings.
- Then, in General > Troubleshooting, uncheck "Enable hardware-assisted virtualisation".
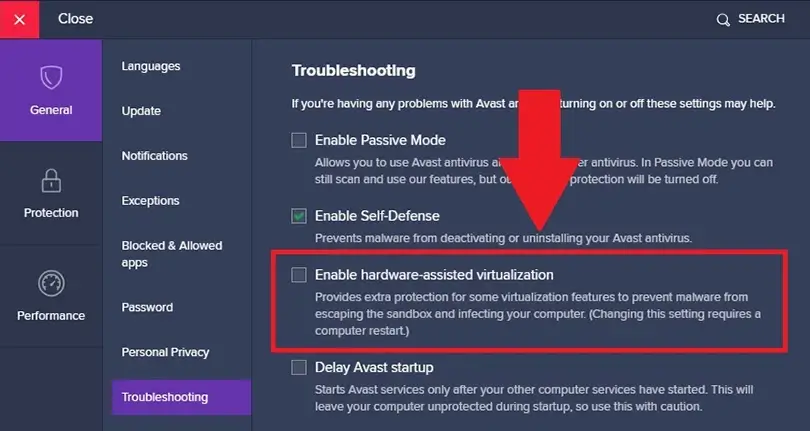
And that's it, you shouldn't have any more problems between Avast and BlueStacks!
3. Disable other virtualisation software to optimise BlueStacks
If you're a fan of virtualisation software such as VirtualBox, Hyper-V or VMWare, you may be experiencing conflicts and loss of performance.
To deal with this, simply disable other virtualisation software in your Windows settings:
Then simply uncheck the software you are using. For the Windows virtualisation service, uncheck Hyper-V, Virtual Machine Platform and Windows Hypervisor Platform (only 1 or 2 of the above settings will be present, depending on your Windows version).
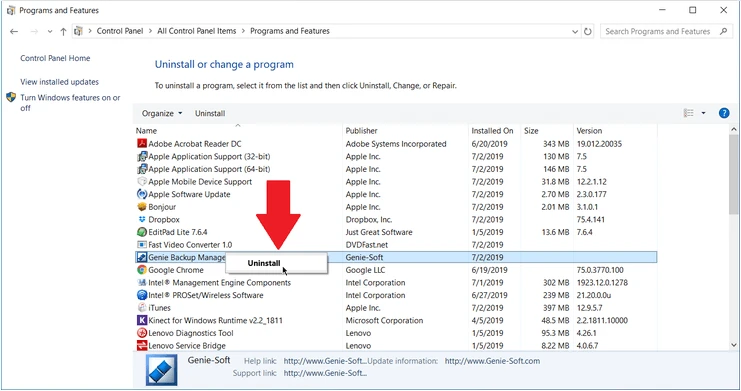
Please note : if you decide to install Google Play Games, BlueStacks and the other emulators will no longer work. You will need to uninstall Google Play Games to be able to use these tools again.
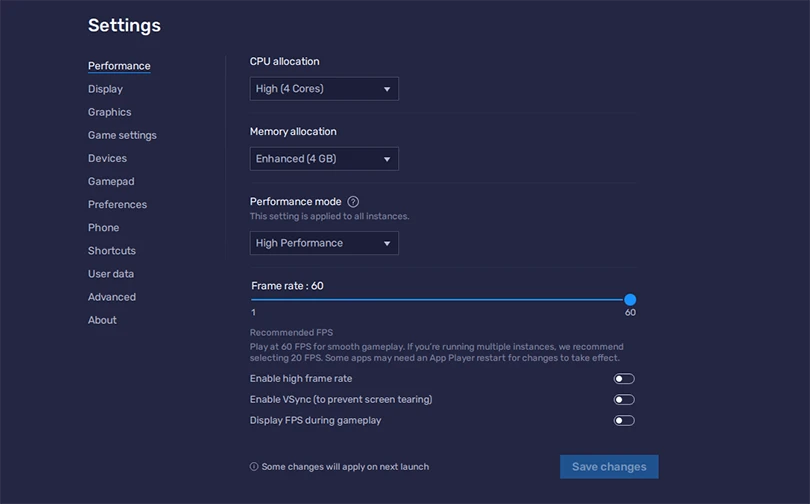
4. Check the performance mode to optimise BlueStacks
BlueStacks 5 offers three levels of performance. To optimise your emulator, remember to check which mode is active so that you can change it if necessary:
- Low memory mode: as the name suggests, this mode uses as little RAM as possible. As a result, BlueStacks performance will be significantly limited .
- Balanced mode: this gives you a good balance between RAM usage and performance. This is the default mode for any computer with 4GB or less of RAM.
- High performance mode: by activating this mode, you allocate maximum RAM to BlueStacks. You'll get the best possible experience. We recommend this mode to optimise BlueStacks if you plan to play resource-intensive games. High Performance is checked by default if your computer has more than 4GB of RAM .
To change the performance mode of BlueStacks 5, simply go to the settings, click on "Performance", then "Performance Mode". Then choose the mode that suits your needs, and save.
5. Accelerate BlueStacks performance by managing the power supply
As a general rule, manufacturers put your computers on a "Normal Use" or "Energy Saver" power supply. To increase the performance of BlueStacks, you can switch your power supply to "High Performance".
To do this, go to your power settings and check the box below:
To access these settings quickly, simply press Windows + R and enter powercfg.cpl.
6. Improving your PC, essential for optimising BlueStacks
If your PC is not powerful enough, BlueStacks may have problems. To fix this, you can upgrade your PC by changing the CPU or adding RAM , for example.
I recommend that you at least comply with the BlueStacks system requirements to ensure that your emulator works properly.
Personally, I advise you to have at least 8GB of RAM and to allocate at least 4GB of RAM to BlueStacks. Of course, you should also keep your system and drivers up to date!
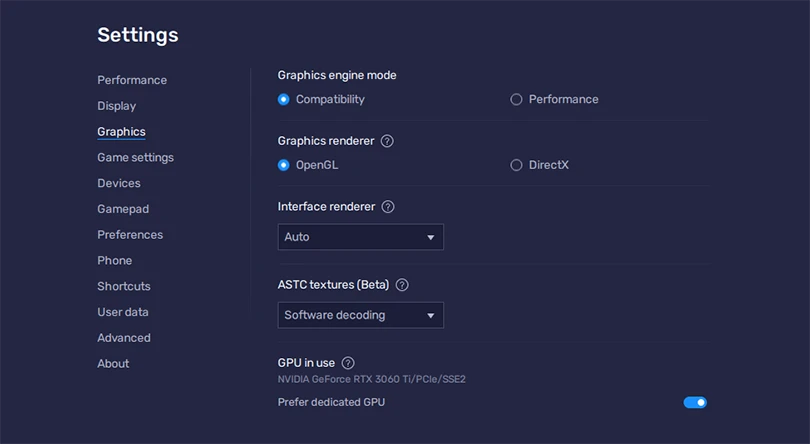
7. Change your GPU settings to improve emulator performance
We've looked at the CPU, now let's move on to your computer's GPU (your graphics card). By modifying its settings, you will be able to allocate more resources to your emulator, so as to optimise BlueStacks 5. By dedicating your graphics card to your tool, you improve FPS (and therefore smoother animations), reduce lag and enjoy better graphics.
The method for dedicating your GPU to BlueStacks is as follows:
- Go to the BlueStacks settings.
- Choose the "Graphics" tab.
- Activate "Prefer a dedicated GPU".
- Restart BlueStacks.
You can also dedicate your card to your emulator via the Windows graphics settings or the BIOS settings.
And that's where this article ends. I hope I've helped you with this BlueStacks performance optimisation and that you're now ready to play in the best possible conditions! 😄
If you really can't get BlueStacks to work properly, I invite you to try another one by choosing from our top of the best Android emulators for PC.
Don't hesitate to check out our other tips on mobile games 😉

Hakio
Co-founder of Mobi.gg and passionate about virtual worlds of all kinds. It seems that Try Hard is also part of his vocabulary.
Follow us
Follow us on our social networks to stay on top of mobile gaming news wherever you are!
Similar articles

Online Android emulator: what to choose?
Looking for an online Android emulator? An emulator that you don't need to download and install on your PC? If so, we've got some advice for you!...
What is the best Android emulator for Mac?
Emulators have long been reserved for Windows users, but it is now possible to run Android applications on MacOS. To do this, you need to downloa...

How to play Harry Potter: Magic Awakened on PC or Mac?
In this guide, we'll detail how to download and play Harry Potter: Magic Awakened on PC. Two methods are possible: via the official Portkey Games...

How to play Pirates of the Caribbean: ToW on PC or Mac?
Pirates of the Caribbean: ToW is available on Android and iOS, but you can also play it on PC or Mac via the browser version (official) or via an...

How to play Dragon Ball Z Dokkan Battle on PC or Mac?
We will explain how to play Dragon Ball Z Dokkan Battle on PC. The advantages are numerous: improved game comfort, battery that does not overheat...

How to play Switch games on mobile?
Want to play Switch games on mobile? It wasn't possible until now. Good news, though, as Skyline, the first Nintendo Switch emulator on mobile, i...


Leave a comment
Your email address will not be published. Required fields are marked with*.