
Welcome to this guide on how to install Mantis Buddy for Android. This application is very handy as it allows you touse a controller to play your mobile games even when this feature is not provided for. Whether you're on your laptop or tablet, it will recognise your PS4, Xbox or any other controller. You can then perform keymapping to assign keys to commands or actions. That's why Mantis Buddy is a must-have app if you like to play with a controller on your smartphone!
Now that we've introduced you to Mantis Buddy, let's first look at how to download Mantis Buddy. You can do this by searching directly in the Play Store. Once you've found the application, all you have to do is download it. Note that Mantis Buddy is only available in English, but don't worry, it's still relatively easy to use.
Once Mantis is launched, click on "Add Game".

Next, select the applications you wish to play with the controller (if you wish to play more than one game, you will need to upgrade to the Pro version). Once you have finished, tap the back arrow in the top left corner of the screen to return to the previous screen.
You will now need to give Mantis Buddy permissions to enable the overlay on your games.
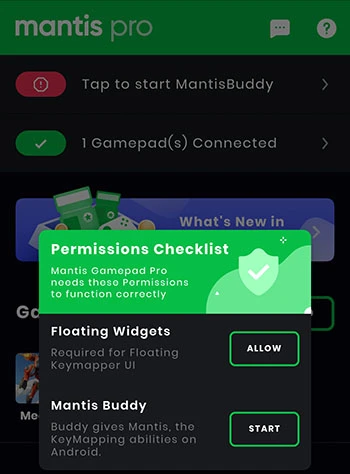
"Floating Widgetswill make Mantis offer you an overlay on the selected game. In short, this overlay will authorize the setting of the keys of your controller. It is therefore essential to accept it by pressing "Allow" next to "Floating Widgets".
As far as "Mantis Buddy" is concerned, this permission will allow you to do KeyMapping with a different method. Also note that this will be the most difficult part of the whole tutorial.
Click on the "Start" button in front of Mantis Buddy. You will be presented with several options. We will select the 3rd one, "Connect Mantis Buddy via Windows/Mac" which will require us to perform a few steps on the computer.

Before we go any further, we will need to check that USB Debugging is enabled on your mobile.
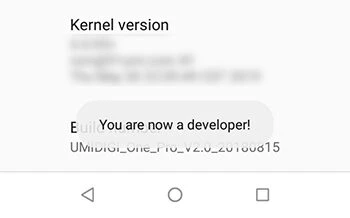
To do this, go to your phone's settings and then to the section called "About Phone" or "About". Locate the version/build number (or MIUI Version) and tap on it a few times. A message should appear at the bottom of your phone telling you that you are a developer.
Finally, go back to the previous menus and go to "System" or "Additional Settings". Select the "Developer Options" submenu. The option "USB debugging" must be checked.
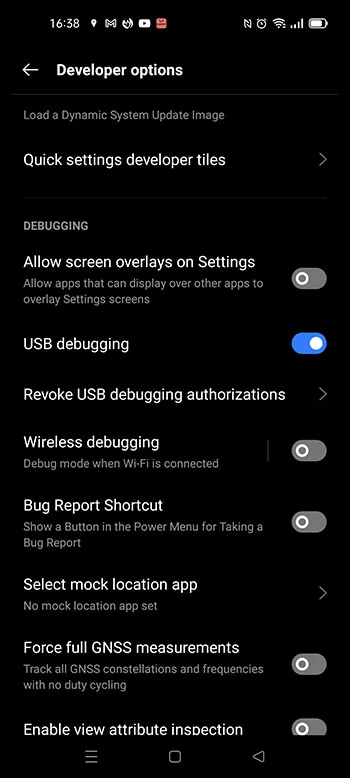
All that remains is to connect your phone to your computer via a USB cable. Accept the USB Debugging mode at the time of connection so that it is active.
We are now ready to do the last part of the PC tutorial to get Mantis Buddy working properly!
Open the official MantisBuddy website and download the software according to your operating system. Then, unzip the newly acquired folder and click on "ActivateBuddy.bat".

A command line window appears and scrolls through the actions performed. After a few seconds of waiting, the message "Mantis Buddy Connected. You're all set" should appear on your phone.

Congratulations, we are done! You can close the command window and disconnect your mobile from the computer.
Warning: If the message "Android Device not found" appears, we invite you to redo the part concerning the USB debugging mode or to click on "Start again" in the popup that appears on your computer.
That's it, Mantis Buddy is now installed on your mobile or tablet. We recommend that you launch your applications from within Mantis Buddy so that the controller is naturally supported by the software. Also, don't forget toadjust your controller settings once you're in the game so that your keys are correctly associated.

Did you know that it is possible to play mobile games with a controller? Of course, some games are better suited to this than others, but if the...

Need help solving Pedantle #1053 of April 05, 2025? Then you've come to the right place. Here you'll find clues and hints to help you find the Wi...

Need help solving Pedantle #1052 of April 04, 2025? Then you've come to the right place. Here you'll find clues and hints to help you find the Wi...

Need help solving Pedantle #1051 of April 03, 2025? Then you've come to the right place. Here you'll find clues and hints to help you find the Wi...

Need help solving Pedantle #1050 of April 02, 2025? Then you've come to the right place. Here you'll find clues and hints to help you find the Wi...

Need help solving Pedantle #1049 of April 01, 2025? Then you've come to the right place. Here you'll find clues and hints to help you find the Wi...

Leave a comment
Your email address will not be published. Required fields are marked with*.